Introduction
Control 8×8 LED matrix wirelessly with Bluetooth: Controlling LED matrices can be a fun and rewarding project for any maker or electronics enthusiast. An 8×8 matrix display is a great way to visually display data, messages, or even simple graphics. But what if you could control this display wirelessly, making it even more interactive? With the right components and setup, you can create a wireless system that lets you control an 8×8 LED matrix through Bluetooth.
This blog will walk you through how to control your 8×8 matrix using a Bluetooth module and MAX7219, an efficient driver for managing LED displays. By the end of this tutorial, you will be able to send data to the LED matrix wirelessly and watch the display change based on the selected dots.
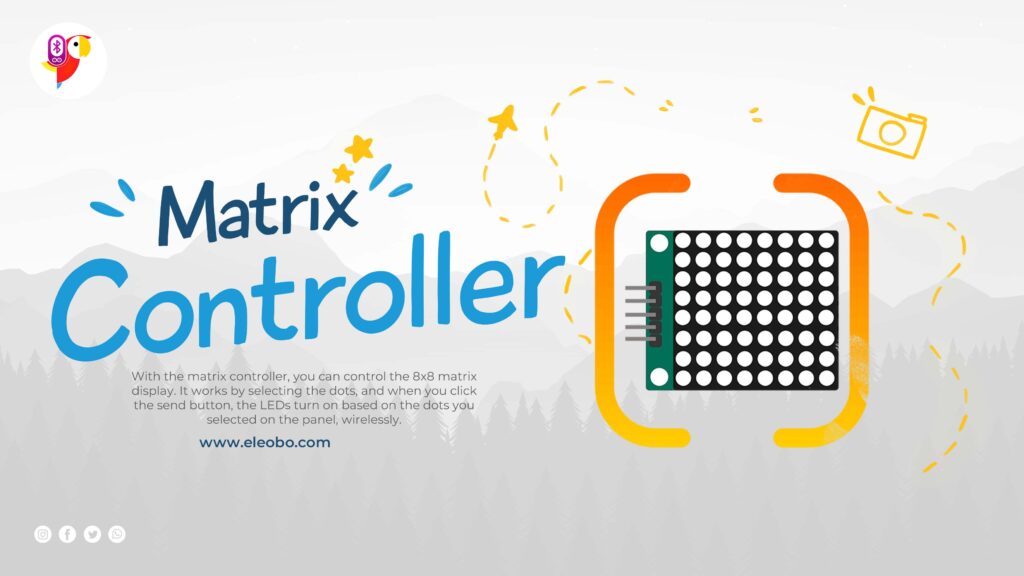
Table of Contents
How to Download the BlueBot Controller App
To get started, download the BlueBot Controller App from the official source:
Make sure you have a Bluetooth-enabled smartphone to pair with your project.
What You’ll Need
Before diving into the setup, let’s gather the necessary components:
- Arduino (or compatible board)
- HC-05 Bluetooth module
- 8×8 LED matrix (MAX7219 module)
- Jumper wires
- Power source for the Arduino
- Breadboard (optional, for easy connections)
Once you have these components, you’ll be ready to start the process of controlling the 8×8 LED matrix wirelessly.
Understanding the Circuit
To control the 8×8 matrix wirelessly, we will use an Arduino board to interface with both the Bluetooth module (HC-05) and the MAX7219 LED driver. Here is how the connections will work:
Bluetooth Module (HC-05)
The HC-05 Bluetooth module allows us to send data wirelessly from a mobile phone or computer to the Arduino. It has two primary connections for communication:
- RX Pin (Receive): Connect this to the Arduino TX pin.
- TX Pin (Transmit): Connect this to the Arduino RX pin.
In our example, we use SoftwareSerial to create a communication channel between the Arduino and the HC-05 module, as the main hardware serial port (0 and 1) is usually reserved for programming and debugging.
MAX7219 and 8×8 LED Matrix
The MAX7219 is a popular IC for controlling 8×8 LED matrices. It simplifies the process of wiring and controlling LEDs by using just a few pins to control an entire display. For this project, we’ll wire the following pins:
- DIN (Data Input): Connect this to pin 4 on the Arduino.
- LOAD (Chip Enable): Connect to pin 5 on the Arduino.
- CLOCK (Clock Pin): Connect to pin 6 on the Arduino.
These connections allow the Arduino to send data to the MAX7219 to control the individual LEDs in the matrix.
Writing the Code
The code we will use in this project enables the Arduino to receive data wirelessly via Bluetooth and control the 8×8 LED matrix based on the received data. Here’s the complete code that accomplishes this task:
#include <SoftwareSerial.h>
#include <LedControl.h>

// Define RX and TX pins for SoftwareSerial
#define RX_PIN 2 // Connect to TX of HC-05
#define TX_PIN 3 // Connect to RX of HC-05

// Initialize SoftwareSerial
SoftwareSerial bluetooth(RX_PIN, TX_PIN);

// Define MAX7219 (LED Matrix) Pins
#define DATA_IN   4  // Pin connected to DIN of MAX7219
#define LOAD       5  // Pin connected to LOAD of MAX7219
#define CLOCK      6  // Pin connected to CLOCK of MAX7219
#define MAX_DEVICES 1  // We have 1 8x8 matrix

// Create LedControl object to control the matrix
LedControl lc = LedControl(DATA_IN, CLOCK, LOAD, MAX_DEVICES);

void setup() {
  Serial.begin(9600);         // Serial Monitor
  bluetooth.begin(9600);      // HC-05 Bluetooth module

  // Initialize the matrix
  for (int i = 0; i < MAX_DEVICES; i++) {
    lc.shutdown(i, false);   // Wake up the device
    lc.setIntensity(i, 8);    // Set brightness (0-15)
    lc.clearDisplay(i);       // Clear the display initially
  }

  Serial.println("Bluetooth Receiver Initialized");
  Serial.println("Waiting for data...");
}

void loop() {
  // Receive the binary matrix string via Bluetooth
  if (bluetooth.available()) {
    String matrixData = bluetooth.readStringUntil('\n');  // Read until newline
    matrixData.trim();  // Remove any extra whitespace
    processMatrixData(matrixData);
  }
}

void processMatrixData(String matrixData) {
  // Split the string by commas to get each row
  String rows[8];
  int row = 0;

  // Split the string by comma into rows
  int index = 0;
  while (matrixData.indexOf(',') != -1 && row < 8) {
    rows[row] = matrixData.substring(0, matrixData.indexOf(','));
    matrixData = matrixData.substring(matrixData.indexOf(',') + 1);
    row++;
  }

  // If there's any leftover part of the string, it's the last row
  if (matrixData.length() > 0 && row < 8) {
    rows[row] = matrixData;
  }

  // Now set the LEDs based on the binary values received
  for (int r = 0; r < 8; r++) {
    for (int c = 0; c < 8; c++) {
      bool ledState = (rows[r][c] == '1');
      lc.setLed(0, r, c, ledState); // Set the LED state in the matrix
    }
  }
}
Focus Keyphrase: control 8×8 LED matrix wirelessly
Code Explanation
- SoftwareSerial Setup: We initialize the Bluetooth module to communicate with the Arduino via pins 2 (RX) and 3 (TX).
- LedControl Setup: We create a
LedControlobject to interface with the MAX7219. This object allows us to easily control the LEDs on the matrix. - Data Reception: The Arduino listens for incoming Bluetooth data. When a matrix configuration is received, it is processed to control the LEDs.
- LED Control: The
processMatrixDatafunction parses the incoming string, which represents the binary state of the LEDs, and then sets the corresponding LEDs on the matrix.
Controlling the Matrix via Bluetooth
To control the matrix, you need to send a binary string to the Arduino via Bluetooth. The string should represent the state of the LEDs in the 8×8 grid, where each row is separated by commas, and each dot in the row is represented as a ‘1’ (ON) or ‘0’ (OFF).
For example, the following string would turn on the first two dots of the first row:
1,1,0,0,0,0,0,0,0,0,0,0,0,0,0,0
This string can be sent via any Bluetooth terminal or custom mobile app. Once the data reaches the Arduino, it is parsed and displayed on the matrix.
Title: Control Your 8×8 LED Matrix Wirelessly with Bluetooth and MAX7219
SEO Title: Control an 8×8 LED Matrix Wirelessly Using Bluetooth with MAX7219
Meta Description: Learn how to control an 8×8 LED matrix wirelessly using a Bluetooth module and MAX7219 with this step-by-step guide. Create an interactive wireless LED display system with ease!
Introduction
Controlling LED matrices can be a fun and rewarding project for any maker or electronics enthusiast. An 8×8 matrix display is a great way to visually display data, messages, or even simple graphics. But what if you could control this display wirelessly, making it even more interactive? With the right components and setup, you can create a wireless system that lets you control an 8×8 LED matrix through Bluetooth.
This blog will walk you through how to control your 8×8 matrix using a Bluetooth module and MAX7219, an efficient driver for managing LED displays. By the end of this tutorial, you will be able to send data to the LED matrix wirelessly and watch the display change based on the selected dots.
Focus Keyphrase: control 8×8 LED matrix wirelessly
What You’ll Need
Before diving into the setup, let’s gather the necessary components:
- Arduino (or compatible board)
- HC-05 Bluetooth module
- 8×8 LED matrix (MAX7219 module)
- Jumper wires
- Power source for the Arduino
- Breadboard (optional, for easy connections)
Focus Keyphrase: control 8×8 LED matrix wirelessly
Once you have these components, you’ll be ready to start the process of controlling the 8×8 LED matrix wirelessly.
Understanding the Circuit
To control the 8×8 matrix wirelessly, we will use an Arduino board to interface with both the Bluetooth module (HC-05) and the MAX7219 LED driver. Here is how the connections will work:
Bluetooth Module (HC-05)
The HC-05 Bluetooth module allows us to send data wirelessly from a mobile phone or computer to the Arduino. It has two primary connections for communication:
- RX Pin (Receive): Connect this to the Arduino TX pin.
- TX Pin (Transmit): Connect this to the Arduino RX pin.
In our example, we use SoftwareSerial to create a communication channel between the Arduino and the HC-05 module, as the main hardware serial port (0 and 1) is usually reserved for programming and debugging.
MAX7219 and 8×8 LED Matrix
The MAX7219 is a popular IC for controlling 8×8 LED matrices. It simplifies the process of wiring and controlling LEDs by using just a few pins to control an entire display. For this project, we’ll wire the following pins:
- DIN (Data Input): Connect this to pin 4 on the Arduino.
- LOAD (Chip Enable): Connect to pin 5 on the Arduino.
- CLOCK (Clock Pin): Connect to pin 6 on the Arduino.
These connections allow the Arduino to send data to the MAX7219 to control the individual LEDs in the matrix.
Writing the Code
The code we will use in this project enables the Arduino to receive data wirelessly via Bluetooth and control the 8×8 LED matrix based on the received data. Here’s the complete code that accomplishes this task:
cppCopy code#include <SoftwareSerial.h>
#include <LedControl.h>

// Define RX and TX pins for SoftwareSerial
#define RX_PIN 2 // Connect to TX of HC-05
#define TX_PIN 3 // Connect to RX of HC-05

// Initialize SoftwareSerial
SoftwareSerial bluetooth(RX_PIN, TX_PIN);

// Define MAX7219 (LED Matrix) Pins
#define DATA_IN   4  // Pin connected to DIN of MAX7219
#define LOAD       5  // Pin connected to LOAD of MAX7219
#define CLOCK      6  // Pin connected to CLOCK of MAX7219
#define MAX_DEVICES 1  // We have 1 8x8 matrix

// Create LedControl object to control the matrix
LedControl lc = LedControl(DATA_IN, CLOCK, LOAD, MAX_DEVICES);

void setup() {
  Serial.begin(9600);         // Serial Monitor
  bluetooth.begin(9600);      // HC-05 Bluetooth module

  // Initialize the matrix
  for (int i = 0; i < MAX_DEVICES; i++) {
    lc.shutdown(i, false);   // Wake up the device
    lc.setIntensity(i, 8);    // Set brightness (0-15)
    lc.clearDisplay(i);       // Clear the display initially
  }

  Serial.println("Bluetooth Receiver Initialized");
  Serial.println("Waiting for data...");
}

void loop() {
  // Receive the binary matrix string via Bluetooth
  if (bluetooth.available()) {
    String matrixData = bluetooth.readStringUntil('\n');  // Read until newline
    matrixData.trim();  // Remove any extra whitespace
    processMatrixData(matrixData);
  }
}

void processMatrixData(String matrixData) {
  // Split the string by commas to get each row
  String rows[8];
  int row = 0;

  // Split the string by comma into rows
  int index = 0;
  while (matrixData.indexOf(',') != -1 && row < 8) {
    rows[row] = matrixData.substring(0, matrixData.indexOf(','));
    matrixData = matrixData.substring(matrixData.indexOf(',') + 1);
    row++;
  }

  // If there's any leftover part of the string, it's the last row
  if (matrixData.length() > 0 && row < 8) {
    rows[row] = matrixData;
  }

  // Now set the LEDs based on the binary values received
  for (int r = 0; r < 8; r++) {
    for (int c = 0; c < 8; c++) {
      bool ledState = (rows[r][c] == '1');
      lc.setLed(0, r, c, ledState); // Set the LED state in the matrix
    }
  }
}
Code Explanation
- SoftwareSerial Setup: We initialize the Bluetooth module to communicate with the Arduino via pins 2 (RX) and 3 (TX).
- LedControl Setup: We create a
LedControlobject to interface with the MAX7219. This object allows us to easily control the LEDs on the matrix. - Data Reception: The Arduino listens for incoming Bluetooth data. When a matrix configuration is received, it is processed to control the LEDs.
- LED Control: The
processMatrixDatafunction parses the incoming string, which represents the binary state of the LEDs, and then sets the corresponding LEDs on the matrix.
Controlling the Matrix via Bluetooth
To control the matrix, you need to send a binary string to the Arduino via Bluetooth. The string should represent the state of the LEDs in the 8×8 grid, where each row is separated by commas, and each dot in the row is represented as a ‘1’ (ON) or ‘0’ (OFF).
For example, the following string would turn on the first two dots of the first row:
Copy code1,1,0,0,0,0,0,0,0,0,0,0,0,0,0,0
This string can be sent via any Bluetooth terminal or custom mobile app. Once the data reaches the Arduino, it is parsed and displayed on the matrix.
Applications of Wireless LED Matrix Control
The ability to wirelessly control an 8×8 LED matrix opens up numerous possibilities for applications:
- Interactive Displays: You can use this setup for interactive displays where users can select patterns or messages using their smartphones.
- Remote Control Systems: You could use it as part of a remote control system for a robot or other electronic projects.
- Wireless Signboards: Display simple messages or graphics on a wireless signboard for events or advertisements.
Conclusion
With this project, you’ve learned how to control an 8×8 LED matrix wirelessly using an Arduino, the MAX7219 driver, and the HC-05 Bluetooth module. The process involves setting up a communication link between the Arduino and a Bluetooth device, receiving matrix data, and displaying it on the LED matrix. This project can be expanded upon to create more complex displays, integrate other sensors or controls, or even develop custom applications for remote interaction.
By understanding how to control 8×8 LED matrix wirelessly, you’ve gained insight into how wireless communication can be used to control displays and other electronic systems.
Download BlueBot Controller App and start your journey today!