If you’ve ever encountered the frustrating scenario where your Arduino shows a successful upload but nothing happens, you’re not alone. This common issue can leave even seasoned makers puzzled. But don’t worry this guide will walk you through step-by-step solutions to troubleshoot and fix the problem. By the end of this blog, you’ll have the tools and knowledge to ensure your Arduino projects run smoothly every time.
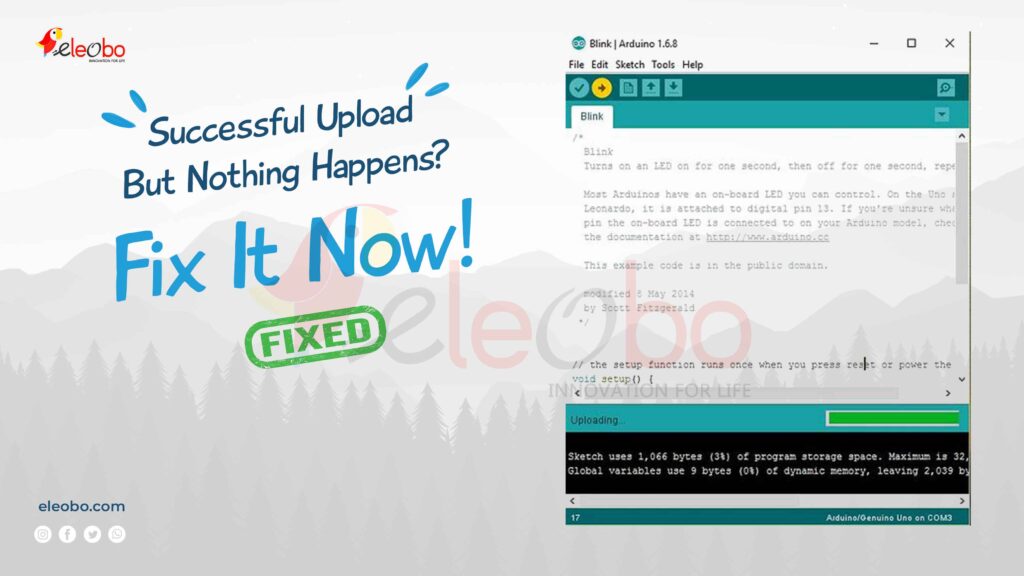
Table of Contents
Why Does a Successful Upload but Nothing Happens Occur?
When your Arduino displays a successful upload but nothing happens, it can feel like a major roadblock. You’ve written your code, connected your components, and the IDE confirms the upload was successful yet, there’s no response from the board. This issue can stem from various factors, including hardware misconfigurations, software glitches, or even coding errors. Let’s dive into the most common causes and how to address them.
1. Check Your Hardware Connections
One of the first things to investigate when you have a successful upload but nothing happens is your hardware setup. Loose or incorrect connections are often the root cause.
- Inspect the USB Cable: Ensure you’re using a high-quality USB cable that supports both power and data transfer. Some cables only provide power, which can lead to upload issues.
- Verify Component Wiring: Double-check that all components are properly connected to the correct pins. A misplaced wire can prevent your sketch from functioning.
- Power Supply Issues: Ensure your Arduino is receiving adequate power. Insufficient power can cause the board to behave unpredictably.
By addressing these hardware issues, you can often resolve the problem quickly.
2. Verify the Correct Board and Port Settings
Another critical step when facing a successful upload but nothing happens is ensuring you’ve selected the correct board and port in the Arduino IDE.
- Select the Right Board: Go to Tools > Board and choose the exact model of your Arduino (e.g., Arduino Uno, Nano, Mega).
- Choose the Correct Port: Navigate to Tools > Port and select the port your Arduino is connected to. On Windows, it will appear as COMX, while on Mac, it will look like /dev/cu.usbmodemXXXX.
Selecting the wrong board or port is a common mistake that can lead to upload failures.
3. Review Your Code for Errors
Sometimes, the issue isn’t with the hardware or settings but with the code itself. When you have a successful upload but nothing happens, it’s worth reviewing your code for potential errors.
- Check for Infinite Loops: An infinite loop in your
setup()function can prevent theloop()function from executing. - Verify Pin Modes: Ensure you’ve set the correct pin modes using
pinMode()for all pins used in your sketch. - Look for Syntax Errors: Even a missing semicolon or bracket can cause your sketch to fail. Use the Arduino IDE’s built-in verification tool to catch these issues.
By carefully reviewing your code, you can often identify and fix the problem without needing additional tools.
4. Reset the Arduino Board
If you have a successful upload but nothing happens, a simple reset might do the trick.
- Manual Reset: Press the reset button on your Arduino board just after the upload completes. This can sometimes kickstart the sketch.
- Power Cycle: Disconnect the board from power, wait a few seconds, and then reconnect it. This can clear any temporary glitches.
Resetting the board is one of the easiest fixes and is always worth a try.
5. Update or Reinstall the Arduino IDE
Outdated or corrupted software can also cause issues. If you have a successful upload but nothing happens, consider updating or reinstalling the Arduino IDE.
- Update the IDE: Download the latest version of the Arduino IDE from the official website.
- Reinstall Drivers: If you’re using a third party board, ensure you’ve installed the necessary drivers.
- Clear Preferences: Sometimes, resetting the IDE preferences can resolve unexpected issues.
Keeping your software up to date is a simple yet effective solution.
6. Test with a Basic Sketch
If you’re still facing issues, try uploading a basic sketch like the Blink example. This can help determine whether the problem is with your code or the hardware.
- Upload the Blink Sketch: Go to File > Examples > 01.Basics > Blink and upload it to your board.
- Observe the Results: If the onboard LED blinks, the issue is likely with your original sketch. If not, the problem may be hardware-related.
Testing with a basic sketch is a crucial step in troubleshooting.
7. Check for Bootloader Issues
A corrupted or missing bootloader can prevent your sketch from running. If you have a successful upload but nothing happens, the bootloader might be the culprit.
- Use an ISP Programmer: You can use an In-System Programmer (ISP) to burn a new bootloader onto your board.
- Follow Tutorials: Many online tutorials guide you through the process of restoring the bootloader.
Fixing bootloader issues is a more advanced solution but can be incredibly effective.
8. Inspect for Hardware Damage
Finally, if none of the above solutions work, your board or components might be damaged.
- Check for Burn Marks: Inspect the board for any visible signs of damage, such as burn marks or broken traces.
- Test with Another Board: If possible, try uploading your sketch to a different Arduino board to rule out hardware issues.
Replacing damaged components is sometimes necessary to get your project back on track.
Conclusion: Solve the Successful Upload but Nothing Happens Issue
When your Arduino shows a successful upload but nothing happens, it can be frustrating, but it’s rarely insurmountable. By following these steps, you can quickly identify and resolve the issue, ensuring your projects run smoothly.
Remember, troubleshooting is a skill that improves with practice. The more you work with Arduino, the better you’ll become at diagnosing and fixing problems. So, don’t get discouraged embrace the challenge and keep creating!
With these solutions in your toolkit, you’re well-equipped to tackle any issues that come your way. Happy making!
Download BlueBot Controller App and start your journey today!