Introduction to Music Rhythm Operated LEDs Using BC547 Transistors
Have you ever wanted to create a dazzling light show that syncs perfectly with your favorite music? With Music Rhythm Operated LEDs using BC547 Transistors, you can bring your musical experience to life! This project is not only fun but also a great way to learn about basic electronics, signal amplification, and circuit design.
In this blog, we’ll walk you through everything you need to know to build your own Music Rhythm Operated LEDs using BC547 Transistors. From understanding the components to assembling the circuit, we’ve got you covered. Let’s dive in!
Table of Contents
Why Choose Music Rhythm Operated LEDs Using BC547 Transistors?
The Music Rhythm Operated LEDs using BC547 Transistors project is a fantastic way to combine music and technology. This circuit uses a simple electret microphone to pick up sound waves, which are then amplified by BC547 transistors to make the LEDs blink in sync with the music.
The BC547 transistor is a versatile and widely available component, making it perfect for beginners. Its ability to amplify signals ensures that your LEDs respond accurately to the rhythm of the music. Whether you’re building a DJ light setup or just want to add some flair to your room, this project is both practical and exciting.
Components Required for Music Rhythm Operated LEDs Using BC547 Transistors
Before we get started, let’s gather all the components you’ll need:
| No. | Component | Quantity |
|---|---|---|
| 1. | Power supply (9V) | 1 |
| 2. | BC547 transistor | 4 |
| 3. | Electret condenser microphone | 1 |
| 4. | 1kΩ resistor | 3 |
| 5. | 10kΩ resistor | 2 |
| 6. | 1MΩ resistor | 1 |
| 7. | 100nf ceramic capacitor | 1 |
| 8. | LED | 3 |
Circuit Diagram and Working Principle
The heart of the Music Rhythm Operated LEDs using BC547 Transistors lies in its circuit design. Here’s how it works:
- Microphone Input: The electret condenser microphone picks up sound waves and converts them into an electrical signal.
- Signal Amplification: The BC547 transistors amplify this weak signal, making it strong enough to drive the LEDs.
- LED Blinking: The amplified signal causes the LEDs to blink in sync with the rhythm of the music.
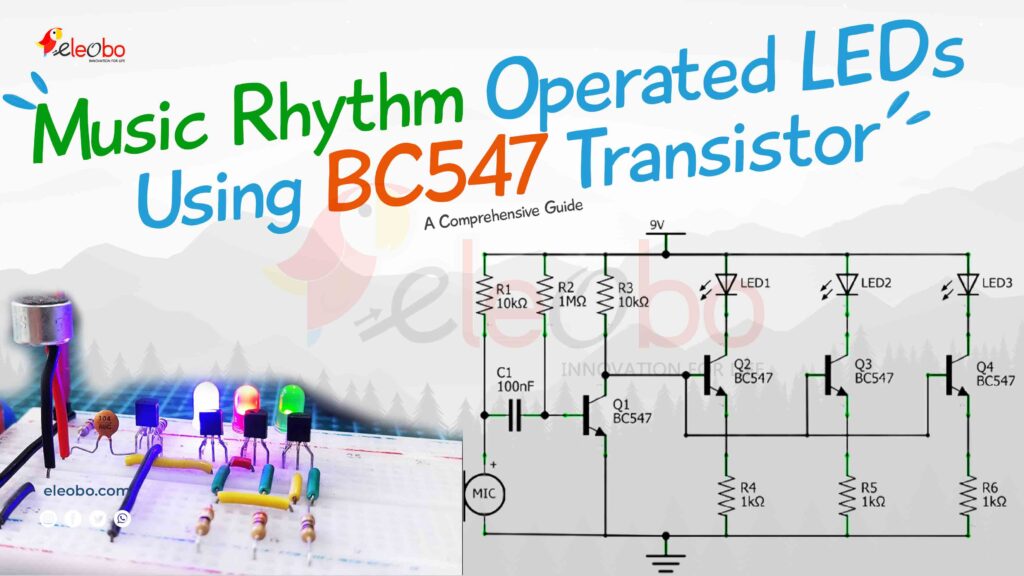
Circuit Connection Details
- Connect the positive terminal of the microphone to a 10kΩ resistor, which is then connected to the positive terminal of the battery.
- Connect the negative terminal of the microphone to the negative terminal of the battery.
- Link the microphone’s positive terminal to a 100nf ceramic capacitor, which is then connected to the base of the first BC547 transistor (Q1).
- Connect the base of Q1 to the positive terminal of the battery through a 1MΩ resistor.
- Connect the collector of Q1 to the positive terminal of the battery through a 10kΩ resistor.
- Link the collector of Q1 to the bases of Q2, Q3, and Q4 transistors.
- Connect the emitters of Q2, Q3, and Q4 to the negative terminal of the battery through 1kΩ resistors.
- Finally, connect the collectors of Q2, Q3, and Q4 to the negative terminal of the battery through LEDs.
This configuration ensures that the LEDs blink in response to the music’s rhythm, creating a visually stunning effect.
Step-by-Step Guide to Building the Circuit
Now that you understand the circuit’s working principle, let’s build it step by step:
Step 1: Prepare Your Workspace
Gather all the components and tools, such as a breadboard, jumper wires, and a soldering iron. Ensure your workspace is clean and well-lit.
Step 2: Connect the Microphone
Start by connecting the electret condenser microphone to the circuit as described above. Double-check the polarity to avoid any mistakes.
Step 3: Install the BC547 Transistors
Place the four BC547 transistors on the breadboard. Connect their bases, collectors, and emitters according to the circuit diagram.
Step 4: Add the Resistors and Capacitors
Insert the resistors and capacitors into the circuit. Pay close attention to their values, as they play a crucial role in determining the circuit’s sensitivity.
Step 5: Connect the LEDs
Attach the LEDs to the collectors of Q2, Q3, and Q4. Ensure that the longer leg (anode) of each LED is connected to the transistor, while the shorter leg (cathode) is connected to the negative terminal of the battery.
Step 6: Power Up the Circuit
Connect the 9V battery to the circuit. Play some music, and watch as the LEDs blink in sync with the rhythm!
Common Questions About Music Rhythm Operated LEDs Using BC547 Transistors
1. Can I use this circuit for a music rhythm LED flashlight?
Yes, you can modify the circuit to create a music rhythm LED flashlight. Simply replace the LEDs with high-intensity ones and adjust the power supply accordingly.
2. Is there a project report or PPT available for this circuit?
While this blog provides a detailed guide, you can easily create a project report or PPT by summarizing the steps and including the circuit diagram.
3. How does the circuit’s sensitivity work?
The sensitivity of the microphone depends on the values of the R2 resistor and C1 capacitor. Adjusting these components can make the circuit more or less responsive to sound.
4. Can I use this circuit for DJ lights?
Absolutely! This circuit is perfect for creating DIY DJ lights that sync with the music.
Tips for Optimizing Your Music Rhythm Operated LEDs
- Experiment with Resistor Values: Try different resistor values to fine-tune the circuit’s sensitivity.
- Use Colored LEDs: Add a variety of colored LEDs to create a more vibrant light show.
- Add More Transistors: If you want to control more LEDs, simply add additional BC547 transistors to the circuit.
Conclusion
Building Music Rhythm Operated LEDs using BC547 Transistors is a rewarding and educational project that combines creativity and technical skills. Whether you’re a beginner or an experienced electronics enthusiast, this circuit offers endless possibilities for customization and experimentation.
So, what are you waiting for? Gather your components, follow the steps, and create your own music-responsive LED light show today!
- Download the BlueBot Controller App here.
- Make sure you have a Bluetooth-enabled smartphone to pair with your project.
Downlaod Basic electronics e-Book Click Here
Visit : Home Page
Learn about other sensors, such as Arduino sensors.