The BMP280 air pressure sensor is a game-changer in the world of environmental sensing. Whether you’re a hobbyist, engineer, or developer, this sensor offers unparalleled accuracy and reliability for measuring air pressure and temperature. In this comprehensive guide, we’ll dive deep into the BMP280 air pressure sensor, exploring its pinout, working principle, voltage requirements, schematics, and troubleshooting tips. By the end, you’ll have a solid understanding of how to integrate this powerful sensor into your projects, especially with Arduino. Let’s get started!
Table of Contents
What is the BMP280 Air Pressure Sensor?
The BMP280 air pressure sensor is a high-precision digital sensor designed to measure barometric pressure and temperature. It’s widely used in applications like weather stations, altitude tracking, and indoor navigation. This sensor is known for its low power consumption, compact size, and excellent performance in harsh environments. With its I2C and SPI communication interfaces, the BMP280 air pressure sensor seamlessly integrates into various electronic systems.
How Does the BMP280 Air Pressure Sensor Work?
The BMP280 air pressure sensor operates on the principle of piezoresistive sensing. Inside the sensor, a tiny diaphragm flexes in response to changes in air pressure. This movement alters the electrical resistance of embedded piezoresistors, which is then converted into a digital signal. Additionally, the sensor includes a temperature sensor to compensate for pressure readings, ensuring high accuracy.
Here’s a step-by-step breakdown of how the BMP280 air pressure sensor works:
- Pressure Sensing: The diaphragm inside the sensor detects changes in atmospheric pressure.
- Signal Conversion: The piezoresistors convert the mechanical stress into an electrical signal.
- Temperature Compensation: The built-in temperature sensor adjusts the pressure readings to account for thermal effects.
- Digital Output: The sensor processes the data and outputs it via I2C or SPI interfaces.
Working Principle of BMP280 Sensor
The BMP280 is a barometric pressure sensor that operates based on the piezoresistive effect. This principle states that mechanical stress applied to a material changes its electrical resistance.
1. Piezoresistive Effect in BMP280
- The BMP280 has a microelectromechanical system (MEMS) pressure sensor.
- Inside the sensor, a thin silicon diaphragm deforms when air pressure changes.
- This deformation alters the resistance of tiny piezoresistors embedded in the diaphragm.
- The change in resistance is measured and converted into a pressure reading.
2. How It Measures Pressure
- The BMP280 senses absolute air pressure (Pa).
- The sensor contains a Wheatstone bridge circuit to measure resistance changes.
- An analog-to-digital converter (ADC) converts the small resistance changes into digital pressure values.
3. How It Calculates Altitude
- The BMP280 uses the formula:
- $$h = \frac{{RT}}{{gM}} \times \ln \left( \frac{{P_0}}{{P}} \right) $$Where:
- $$h$$ = altitude (m)
- $$R$$ = gas constant (8.314 J/mol·K)
- $$T$$ = temperature (K)
- $$g$$ = gravitational acceleration (9.81 m/s²)
- $$M$$ = molar mass of air (0.029 kg/mol)
- $$P_0$$ = reference pressure (usually 1013.25 hPa at sea level)
- $$P$$ = measured pressure
Lower air pressure at higher altitudes allows the sensor to estimate height above sea level.
4. How It Measures Temperature
- The BMP280 has an integrated temperature sensor to compensate for pressure variations.
- It works by measuring changes in the resistance of a temperature-sensitive element.
BMP280 Pinout and Voltage Requirements
Understanding the BMP280 pinout is crucial for proper integration. The sensor typically comes in a module form with the following pins:
- VCC: Connects to 3.3V (some modules support 5V).
- GND: Ground connection.
- SCL: Serial Clock for I2C communication.
- SDA: Serial Data for I2C communication.
- CSB: Chip Select for SPI communication.
- SDO: Serial Data Out for SPI communication.
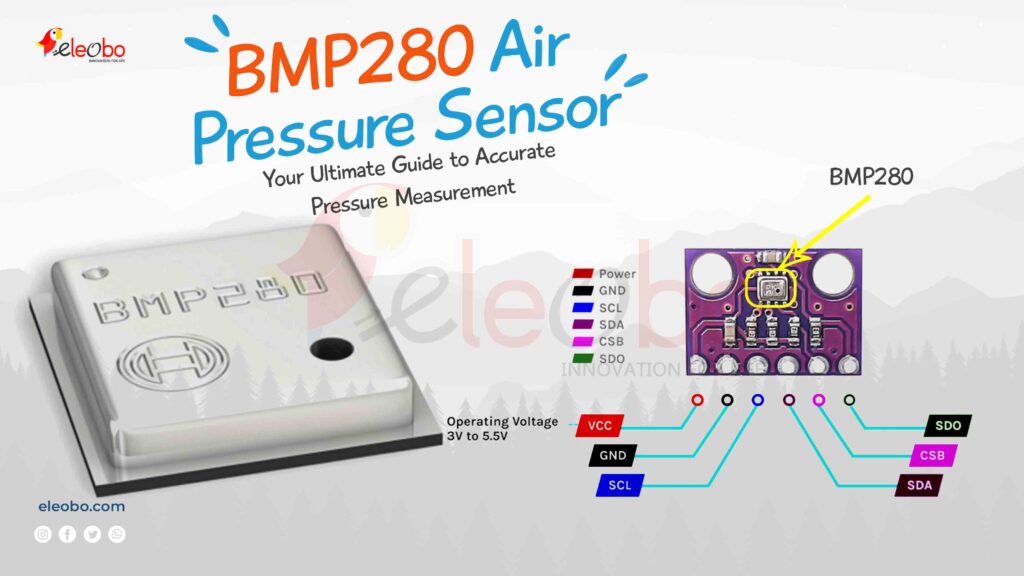
The BMP280 voltage requirement is usually 3.3V, but some modules include voltage regulators to support 5V systems. Always check the datasheet or module specifications to avoid damaging the sensor.
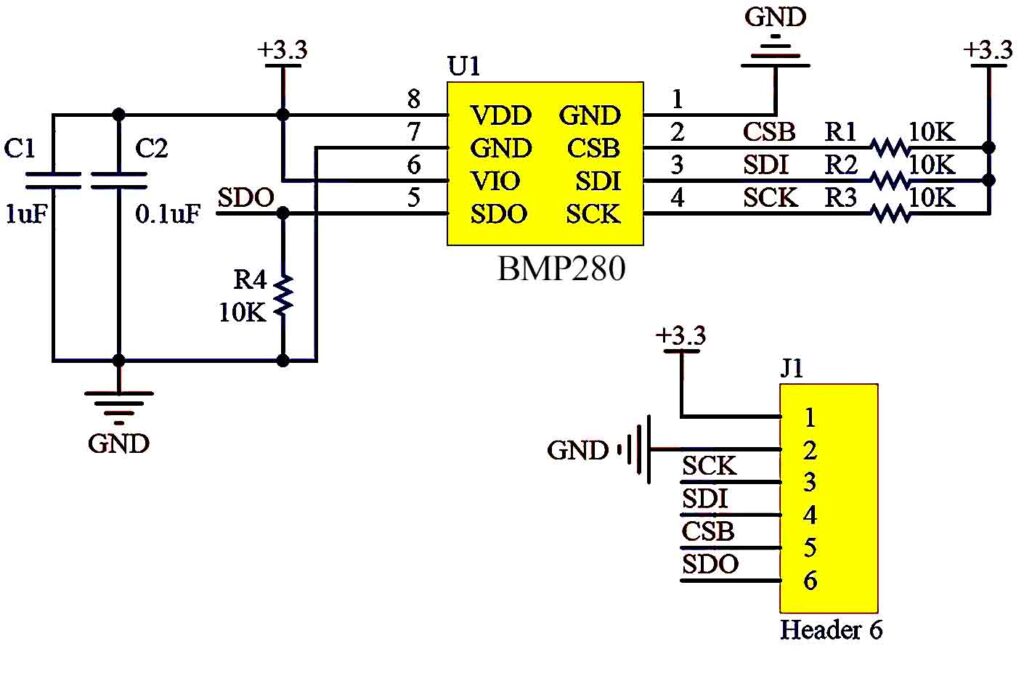
BMP280 Schematic and Module Design
The BMP280 module is designed for easy integration. It typically includes pull-up resistors for I2C communication and a voltage regulator for compatibility with 5V systems. Here’s a basic schematic of how to connect the BMP280 air pressure sensor to an Arduino:
- VCC to 3.3V (or 5V if supported).
- GND to GND.
- SCL to Arduino A5 (for I2C).
- SDA to Arduino A4 (for I2C).
For SPI communication:
- CSB to a digital pin (e.g., D10).
- SDO to a digital pin (e.g., D12).
- SCL to Arduino SCK (D13).
- SDA to Arduino MOSI (D11).
BMP280 vs. BME280 – Differences & Best Choice
When searching for affordable weather sensors, two popular options are the BMP280 and BME280. While their names sound similar, the key difference lies in humidity measurement.
Key Difference
- BME280: Measures humidity, temperature, and pressure.
- BMP280: Measures only temperature and pressure, not humidity.
Aside from this, both sensors have similar specifications, making them almost identical in performance except for the additional humidity sensor in the BME280.
BMP280 Sensor Overview
The BMP280 is a digital pressure sensor designed for easy use with basic electronic components.
Parts and Components
- Power pins: VCC (Power) and GND (Ground).
- Data pins: SCL, SDA, SDO, and SDI (5V tolerant).
- Filter capacitors: Two 100nF capacitors for analog and digital power filtering.
- Resistors:
- Three pull-up resistors for SCL, SDA, and SDO.
- One pull-down resistor for SDI.
It is a MEMS-based sensor, capable of detecting sudden changes in barometric pressure and temperature with high accuracy.
Which One is the Best?
- If you need humidity measurements, go for BME280.
- If you only need pressure and temperature readings, the BMP280 is a cheaper and reliable alternative.
For weather monitoring and environmental sensing, the BME280 is the better choice as it provides complete atmospheric data.
BMP280 Datasheet: Key Specifications
The BMP280 datasheet provides detailed information about the sensor’s performance and capabilities. Key specifications include:
- Pressure Range: 300 hPa to 1100 hPa.
- Temperature Range: -40°C to +85°C.
- Accuracy: ±1 hPa (pressure), ±1°C (temperature).
- Power Consumption: 2.7 µA at 1 Hz sampling rate.
BMP280 and Arduino: A Perfect Match
Integrating the BMP280 air pressure sensor with Arduino is straightforward. Here’s a simple example using the Adafruit BMP280 library:
#include <Wire.h>
#include <Adafruit_BMP280.h>

Adafruit_BMP280 bmp;

void setup() {
  Serial.begin(9600);
  if (!bmp.begin(0x76)) {
    Serial.println("Could not find a valid BMP280 sensor, check wiring!");
    while (1);
  }
}

void loop() {
  Serial.print("Temperature = ");
  Serial.print(bmp.readTemperature());
  Serial.println(" *C");

  Serial.print("Pressure = ");
  Serial.print(bmp.readPressure());
  Serial.println(" Pa");

  Serial.print("Altitude = ");
  Serial.print(bmp.readAltitude(1013.25)); // Adjust sea level pressure
  Serial.println(" m");

  delay(2000);
}
This code reads temperature, pressure, and altitude data from the BMP280 air pressure sensor and prints it to the Serial Monitor.
Explanation of BMP280 Sensor Code
This Arduino code is used to interface the BMP280 sensor with an Arduino to measure temperature, pressure, and altitude.
Code Breakdown
1. Include Required Libraries
#include <Wire.h>
#include <Adafruit_BMP280.h>Wire.h: Required for I2C communication.Adafruit_BMP280.h: Library for BMP280 sensor functions.
2. Create BMP280 Object
Adafruit_BMP280 bmp;- Creates an instance of the BMP280 sensor.
3. Setup Function
void setup() {
Serial.begin(9600);- Initializes serial communication at 9600 baud rate for debugging.
  if (!bmp.begin(0x76)) {
    Serial.println("Could not find a valid BMP280 sensor, check wiring!");
    while (1);
}- Tries to initialize the BMP280 sensor using I2C address 0x76.
- If the sensor is not found, it prints an error message and stops the program using
while(1);(infinite loop).
4. Loop Function
void loop() {- Runs continuously to read and display sensor data.
5. Read and Display Temperature
  Serial.print("Temperature = ");
  Serial.print(bmp.readTemperature());
Serial.println(" *C");- Reads the temperature from BMP280 using
bmp.readTemperature(). - Prints it to the Serial Monitor in degrees Celsius (°C).
6. Read and Display Pressure
  Serial.print("Pressure = ");
  Serial.print(bmp.readPressure());
  Serial.println(" Pa");
7. Calculate and Display Altitude
  Serial.print("Altitude = ");
  Serial.print(bmp.readAltitude(1013.25)); // Adjust sea level pressure
Serial.println(" m");- Calculates the altitude (height above sea level) using
bmp.readAltitude(1013.25). 1013.25 hPais the standard sea-level pressure in Pascals (101325 Pa).- The function estimates altitude based on air pressure.
8. Add Delay
  delay(2000);
}- Waits for 2 seconds before taking the next set of readings.
Summary of Functionality
- Initializes the BMP280 sensor.
- Reads and prints temperature, pressure, and altitude.
- Loops every 2 seconds to update the readings.
This code is useful for weather monitoring, altitude estimation, and environmental sensing applications.
BMP280 Sensor Price and Availability
The BMP280 air pressure sensor is affordable and widely available. Prices typically range from $5 to $15, depending on the module and seller. It’s a cost-effective solution for adding pressure sensing capabilities to your projects.
Troubleshooting the BMP280 Air Pressure Sensor
If your BMP280 air pressure sensor isn’t working, follow these steps to troubleshoot:
- Check Wiring: Ensure all connections are correct and secure.
- Verify Voltage: Confirm the sensor is receiving the correct voltage (3.3V or 5V).
- Test Communication: Use an I2C scanner to check if the sensor is detected.
- Update Libraries: Ensure you’re using the latest version of the BMP280 library.
- Inspect Module: Look for physical damage or soldering issues.
Frequently Asked Questions (FAQ)
1. Why is my BMP280 not sending data?
This issue is often caused by incorrect wiring or communication settings. Double-check your connections and ensure the sensor is properly powered.
2. How does the BMP280 measure pressure?
The BMP280 air pressure sensor uses a piezoresistive element to detect pressure changes and converts them into digital data.
3. What is the working principle of the BMP sensor?
The sensor relies on the piezoresistive effect, where mechanical stress changes the electrical resistance of a material.
4. How do I fix a BMP280 error?
Start by checking the wiring, voltage, and communication settings. If the issue persists, consult the datasheet or seek help from online forums.
Conclusion
The BMP280 air pressure sensor is a versatile and reliable tool for measuring barometric pressure and temperature. Its compact design, low power consumption, and high accuracy make it ideal for a wide range of applications. By understanding its pinout, working principle, and integration with Arduino, you can unlock the full potential of this powerful sensor. Whether you’re building a weather station or an altitude tracker, the BMP280 air pressure sensor is your go-to solution for precise environmental sensing.
For Bluetooth HC05 Projects : Download BlueBot Controller App and start your journey today!