The DS18B20 Waterproof Temperature Sensor is a versatile and reliable component that excels in a wide range of applications, from environmental monitoring to industrial automation. Its waterproof design ensures it can withstand harsh conditions, making it ideal for outdoor projects like monitoring water temperatures in ponds, aquariums, or even homebrewing setups. The DS18B20 Waterproof Temperature Sensor communicates over a 1-Wire interface, allowing multiple sensors to be connected to a single Arduino pin, which simplifies wiring and saves valuable I/O resources.
With a temperature range of -55°C to +125°C and an accuracy of ±0.5°C, the DS18B20 Waterproof Temperature Sensor delivers precise readings, ensuring your data is both reliable and actionable. Whether you’re a hobbyist or a professional, the DS18B20 Waterproof Temperature Sensor is an indispensable tool for achieving accurate and consistent temperature measurements in your projects. Its durability, ease of integration, and high performance make it a top choice for anyone looking to enhance their Arduino-based temperature sensing applications.
Table of Contents
Why Choose the DS18B20 Waterproof Temperature Sensor?
When it comes to temperature sensing, the DS18B20 Waterproof Temperature Sensor is a top contender. Here’s why:
- Accuracy: The DS18B20 Waterproof Temperature Sensor delivers precise readings with an accuracy of +/- 0.5°C.
- Wide Range: It operates seamlessly in temperatures ranging from -55°C to +125°C, making it versatile for various environments.
- One-Wire Communication: This feature allows you to connect multiple DS18B20 Sensors with Arduino to a single pin, saving valuable I/O resources.
- Waterproof Design: The rugged, waterproof casing makes the DS18B20 Waterproof Temperature Sensor ideal for applications involving liquids or outdoor conditions.
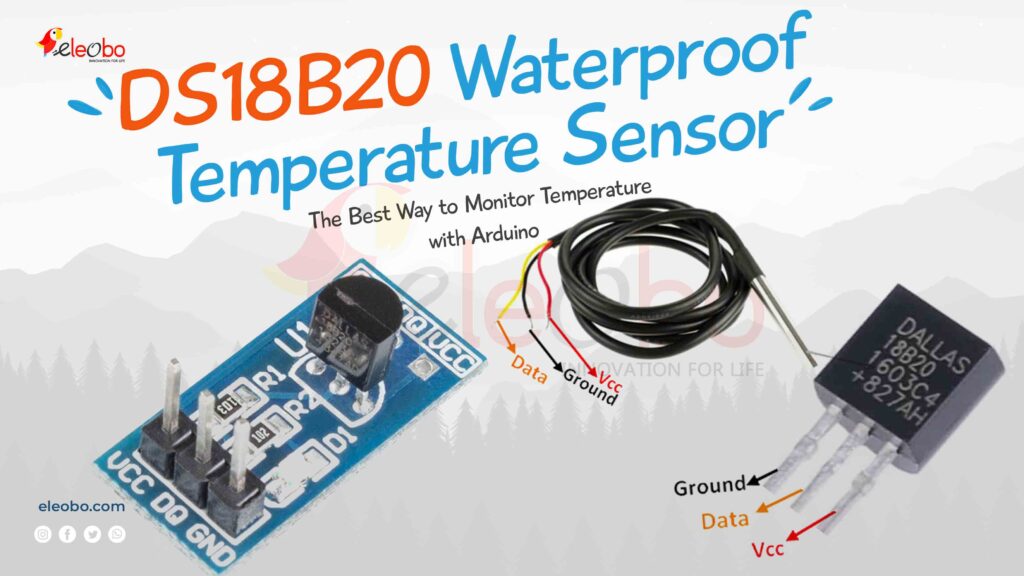
DS18B20 PINOUT
Whether you’re monitoring an aquarium, controlling a greenhouse, or tracking industrial processes, the DS18B20 Sensor with Arduino is your go-to solution.Parts Required
To get started with the DS18B20 Waterproof Temperature Sensor, gather the following components:
- Arduino Uno (or any compatible board)
- DS18B20 Waterproof Temperature Sensor
- 4.7k Ohm resistor
- Jumper wires
- Breadboard
What is DS18B20?
The DS18B20 is a digital temperature sensor widely used for precise temperature measurement applications. It operates on the 1-Wire communication protocol, allowing multiple sensors to connect to a single data pin, making it efficient for various embedded systems. The sensor provides 9-bit to 12-bit temperature readings with a range of -55°C to +125°C and an accuracy of ±0.5°C within -10°C to +85°C. Unlike analog temperature sensors, the DS18B20 does not require an external ADC (Analog-to-Digital Converter), making it easy to interface with microcontrollers like Arduino, Raspberry Pi, ESP8266, and STM32.
History and Development of DS18B20
The DS18B20 sensor was originally developed by Dallas Semiconductor, a company known for its innovative digital sensor solutions. Later, in 2001, Dallas Semiconductor was acquired by Maxim Integrated, which continued to manufacture and improve the sensor. The DS18B20 became popular due to its low power consumption, high accuracy, and ease of integration in both industrial and DIY electronics projects. Over the years, its affordability and robustness have made it a standard choice for temperature monitoring applications.
Why and Where is DS18B20 Used?
The DS18B20 is widely used in various temperature-sensitive applications, such as weather monitoring systems, home automation, industrial process control, HVAC (Heating, Ventilation, and Air Conditioning), and medical devices. Its waterproof variant is used for liquid temperature measurement, making it ideal for aquariums, hydroponics, and water temperature monitoring. Hobbyists, students, and engineers can use the DS18B20 in their projects to measure temperature efficiently. It is compatible with Arduino, ESP32, ESP8266, Raspberry Pi, STM32, PIC microcontrollers, and more, making it a versatile and reliable sensor for numerous embedded systems.
How does the DS18B20 work?
The DS18B20 works based on a digital 1-Wire communication protocol, which allows multiple sensors to be connected on a single data line. It measures temperature using an internal thermometer and then converts the analog signal into digital format.
The DS18B20 is a digital temperature sensor. It measures temperature and sends the data to a microcontroller (like Arduino, Raspberry Pi, etc.) using a special communication method called the 1-Wire protocol. It’s small, accurate, and can measure temperatures from -55°C to +125°C.
How the Temperature Sensor Works – Step-by-Step Explanation
1. The Sensor Contains a Thermistor-Like Sensing Element
A thermistor is a temperature-sensitive resistor that changes its resistance based on temperature variations. The sensor uses a similar element that detects heat and converts it into an electrical signal. This allows the sensor to measure temperature accurately.
2. The Analog-to-Digital Converter (ADC) Converts Resistance to a Digital Reading
Inside the sensor, there is an Analog-to-Digital Converter (ADC) that transforms the resistance changes into a digital signal. This conversion process is essential because microcontrollers work with digital data rather than raw resistance values.
3. Digital Signal Transmission via the 1-Wire Protocol
The temperature data is sent to the microcontroller using the 1-Wire communication protocol. This protocol allows data transfer using just one data line, making it efficient for applications where minimal wiring is needed. It ensures reliable and fast communication between the sensor and the microcontroller.
4. Temperature Readings in Celsius or Fahrenheit
Once the data reaches the microcontroller, it can be processed and displayed in Celsius (°C) or Fahrenheit (°F), depending on the application requirements. This flexibility makes the sensor suitable for a wide range of uses, including home automation, industrial monitoring, and IoT-based temperature sensing.
Pin Configuration and Wiring
The DS18B20 sensor comes in a 3-pin package:
- GND: Ground.
- DQ: Data line for communication.
- VDD: Power supply (3.0V to 5.5V).
The sensor can operate in two modes:
- Normal Mode: Requires a 3-wire connection (VDD, GND, DQ).
- Parasite Mode: Operates with a 2-wire connection (GND and DQ), where the sensor derives power from the data line.
Understanding the Two Modes of DS18B20 Temperature Sensor: Normal Mode vs. Parasite Mode
1. Wiring the DS18B20 Normal Mode (3-Wire Mode)
How It Works
In Normal Mode, the DS18B20 requires three wires for operation:
- VDD – Connected to a 5V (or 3.3V) power source
- GND – Connected to the ground (0V)
- DQ – Data line (connected to an Arduino digital pin with a 4.7kΩ pull-up resistor)
Here, the sensor gets power directly from the VDD pin and communicates with the microcontroller through the DQ pin.
Why Use Normal Mode?
- More stable operation: Since the sensor gets a dedicated power supply, it can operate consistently across different environments.
- Faster response time: The sensor can measure temperatures and send data more quickly.
- Multiple sensors support: Easier to handle multiple sensors on the same data line because each gets enough power.
Application Examples of Normal Mode
- Industrial Temperature Monitoring: Factories or warehouses that need continuous, reliable temperature readings.
- Smart Agriculture: Greenhouses where multiple sensors monitor temperature variations.
- Medical Equipment: Incubators and sterilization devices where precise temperature control is required.
Wiring Diagram for DS18B20 Parasite Mode (2-Wire Mode) & Normal Mode (3-Wire Mode)
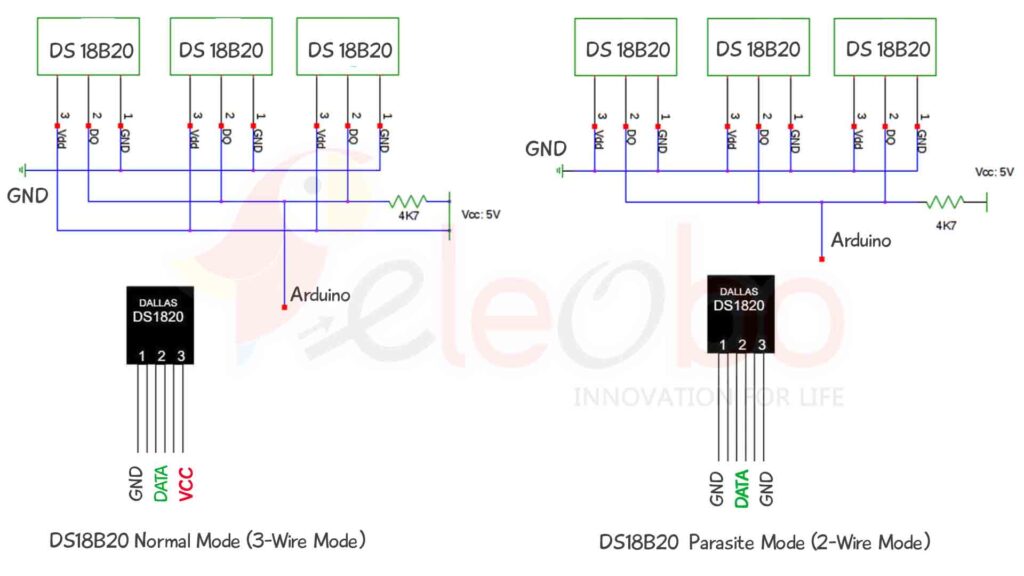
2. Wiring the DS18B20 Parasite Mode (2-Wire Mode)
How It Works
In Parasite Mode, the DS18B20 operates using only two wires:
- GND – Connected to ground (0V)
- DQ – Connected to an Arduino digital pin with a 4.7kΩ pull-up resistor
Here, the VDD pin is not used. Instead, the sensor draws power directly from the DQ (data) line.
Why Use Parasite Mode?
- Simplifies wiring: Reduces the number of wires, making it useful for compact or hard-to-reach installations.
- Useful for battery-powered systems: Reduces power consumption, extending battery life.
- Ideal for long-distance wiring: With fewer wires, it minimizes installation complexity in large networks.
Application Examples of Parasite Mode
- Refrigerators & Freezers: Temperature monitoring inside appliances where additional wiring is impractical.
- Remote Temperature Sensing: Weather stations or outdoor sensors that need long-distance wiring.
- Battery-Powered IoT Devices: Smart home devices where minimal power consumption is crucial.
Choosing Between Normal and Parasite Mode
| Feature | Normal Mode (3-Wire) | Parasite Mode (2-Wire) |
|---|---|---|
| Power Source | External (VDD pin) | Draws power from data line |
| Stability | More stable | May be affected by long wires |
| Speed | Faster response | Slightly slower |
| Wiring Complexity | More wiring | Fewer wires, simpler setup |
| Best Use Case | Multiple sensors, high precision | Remote sensors, low-power applications |
In summary:
- Use Normal Mode for better stability and speed, especially when using multiple sensors.
- Use Parasite Mode when you need simplified wiring and lower power consumption for remote applications.
Installing Required Libraries
To interact with the DS18B20 Waterproof Temperature Sensor, you’ll need two libraries:
- OneWire Library: Handles one-wire communication.
- DallasTemperature Library: Simplifies temperature data retrieval.
Installation Steps:
- Open the Arduino IDE.
- Navigate to Sketch > Include Library > Manage Libraries.
- Search for OneWire and install it.
- Search for DallasTemperature and install it.
With these libraries installed, you’re ready to start coding!
Arduino Code for Single DS18B20 Sensor
Here’s a simple code to read temperature values from a single DS18B20 Waterproof Temperature Sensor:
#include <OneWire.h>
#include <DallasTemperature.h>

#define ONE_WIRE_BUS 4
OneWire oneWire(ONE_WIRE_BUS);
DallasTemperature sensors(&oneWire);

void setup() {
  Serial.begin(9600);
  sensors.begin();
}

void loop() {
  sensors.requestTemperatures();
  Serial.print("Temperature: ");
  Serial.print(sensors.getTempCByIndex(0));
  Serial.println(" °C");
  delay(1000);
}
This code initializes the DS18B20 Sensor with Arduino, requests temperature readings, and prints them to the Serial Monitor.
Reading Multiple DS18B20 Sensors
One of the standout features of the DS18B20 Waterproof Temperature Sensor is its ability to connect multiple sensors to a single Arduino pin. Here’s how to read data from multiple DS18B20 Sensors with Arduino:
#include <OneWire.h>
#include <DallasTemperature.h>

#define ONE_WIRE_BUS 4
OneWire oneWire(ONE_WIRE_BUS);
DallasTemperature sensors(&oneWire);

void setup() {
  Serial.begin(9600);
  sensors.begin();
}

void loop() {
  sensors.requestTemperatures();
  for (int i = 0; i < sensors.getDeviceCount(); i++) {
    Serial.print("Sensor ");
    Serial.print(i + 1);
    Serial.print(" Temperature: ");
    Serial.print(sensors.getTempCByIndex(i));
    Serial.println(" °C");
  }
  delay(1000);
}
This code scans all connected DS18B20 Waterproof Temperature Sensors and displays their readings individually.
Practical Applications of the DS18B20 Waterproof Temperature Sensor
The DS18B20 Waterproof Temperature Sensor is incredibly versatile. Here are some practical applications:
- Aquarium Temperature Monitoring: Ensure your aquatic pets thrive by maintaining optimal water conditions using the DS18B20 Sensor with Arduino.
- Greenhouse Climate Control: Monitor and regulate temperature to create the perfect environment for plants with the DS18B20 Waterproof Temperature Sensor.
- Industrial Temperature Tracking: Use the DS18B20 Sensor with Arduino to monitor machinery and processes in real-time.
- Home Automation Systems: Integrate the DS18B20 Waterproof Temperature Sensor into smart home systems for energy efficiency and comfort.
Alternative Sensors of DS18B20
Here are four alternative temperature sensors that you can use instead of the DS18B20
- DHT11 – Measures temperature and humidity, low-cost but lower accuracy.
- DHT22 (AM2302) – Better accuracy and range than DHT11, but slightly more expensive.
- LM35 – Analog temperature sensor with high accuracy, requires an ADC for microcontrollers without an analog input.
- BMP280 – Measures temperature, pressure, and altitude, commonly used in weather applications.
Comparison Table
| Sensor | Type | Temperature Range | Accuracy | Output Type | Extra Features |
|---|---|---|---|---|---|
| DS18B20 | Digital | -55°C to 125°C | ±0.5°C | 1-Wire Digital | Waterproof version available |
| DHT11 | Digital | 0°C to 50°C | ±2°C | Digital | Measures Humidity |
| DHT22 (AM2302) | Digital | -40°C to 80°C | ±0.5°C | Digital | Measures Humidity |
| LM35 | Analog | -55°C to 150°C | ±0.5°C | Analog Voltage | Needs ADC for MCU |
| BMP280 | Digital | -40°C to 85°C | ±1°C | I2C / SPI | Measures Pressure & Altitude |
What is inside the DS18B20?
Inside the DS18B20, you will find:
- Temperature sensing element (a silicon-based thermistor)
- Analog-to-Digital Converter (ADC)
- 1-Wire communication interface
- Non-volatile memory (EEPROM) to store calibration data
- Power supply components (it can operate in parasite power mode, drawing power from the data line)
How is the DS18B20 built?
The DS18B20 sensor is built using semiconductor fabrication techniques, similar to other integrated circuits (ICs). The core materials include:
- Silicon wafers used to form the sensing element and digital circuits
- Plastic or stainless steel (TO-92 or waterproof casing) to protect the sensor from environmental damage
- Gold or aluminum bonding wires that connect the sensor die to the pins
How does the DS18B20 capture temperature?
The sensor captures temperature based on the principle of resistance change with temperature. Here’s how:
- The sensing element changes its electrical properties when the temperature varies.
- The internal ADC converts the change into a digital value.
- The microcontroller reads this digital value through the 1-Wire interface and displays it as temperature.
Common questions related to DS18B20
| Question | Answer |
|---|---|
| What is the operating voltage? | 3.0V to 5.5V |
| What is the temperature range? | -55°C to +125°C |
| What is the accuracy? | ±0.5°C (between -10°C and +85°C) |
| How many sensors can be connected on one wire? | Multiple sensors can be used on a single data pin because each has a unique 64-bit address. |
| What is parasite power mode? | The sensor can be powered directly from the data line, eliminating the need for an external power source. |
| Which protocol does it use? | 1-Wire communication protocol |
| How to interface it with Arduino? | Connect VCC to 5V, GND to GND, DATA to a digital pin (with a 4.7kΩ pull-up resistor). Use the DallasTemperature library to read data. |
Conclusion
The DS18B20 Waterproof Temperature Sensor is undoubtedly one of the best tools for temperature monitoring with Arduino. Its accuracy, durability, and ease of use make it ideal for a wide range of applications. Whether you’re a hobbyist or a professional, the DS18B20 Sensor with Arduino will elevate your projects to the next level.
Start your temperature-sensing journey today with the DS18B20 Waterproof Temperature Sensor and unlock endless possibilities!
By following this guide, you’ll master the use of the DS18B20 Sensor with Arduino and create innovative projects with confidence. Don’t wait—get your DS18B20 Waterproof Temperature Sensor now and take the first step toward smarter temperature monitoring!
- Download the BlueBot Controller App here.
- Make sure you have a Bluetooth-enabled smartphone to pair with your project.
Downlaod Basic electronics e-Book Click Here
Visit : Home Page
Learn about other sensors, such as Arduino sensors.