Do you want to create custom characters for your Arduino 16×2 LCD quickly and effortlessly? Look no further! The Arduino 16×2 LCD Custom Character Generator is here to simplify the process. Whether you’re a beginner or an experienced maker, this tool helps you design, preview, and generate custom characters in seconds.
Arduino LCD Character Generator
Click on the grid to create custom characters for 16×2 LCD displays.
Saved Characters
Add 5 Characters at Once
Select up to 5 characters to add to LCD:
LCD Preview
“Do you want to create a character by combining all?”
How to Use the Arduino 16×2 LCD Custom Character Generator
The Arduino 16×2 LCD Custom Character Generator is a powerful tool that helps you create unique characters for your 16×2 LCD display. Follow these steps to design and implement your own characters:
Step 1: Open the Tool
Ensure that the Arduino 16×2 LCD Custom Character Generator is open in your browser.
Step 2: Design Your Custom Character
- Click on the grid cells to turn pixels on or off.
- Each blue cell represents a lit pixel on the LCD display.
- You can modify the grid as needed to create any custom shape.
Step 3: Name and Save Your Character
- Enter a Character Name in the input box.
- Click “Save Character” to store your design.
- The character will be listed in the Saved Characters section for future use.
Step 4: Add the Character to LCD Preview
- Click “Add to LCD” to see how your character appears on a 16×2 LCD screen.
Step 5: Generate and Copy the Code
- Scroll down to the Generated Code section.
- Click “Copy Code” to copy the Arduino code for your character.
- Paste the copied code into your Arduino IDE and upload it to your microcontroller.
Step 6: Manage Your Saved Characters
- Click on a saved character to edit or delete it.
- Use the delete button (red circle) to remove characters you no longer need.
Add 5 Characters at Once to LCD
How to Do It
Step 1: Select Characters
- Click on a character to select it.
- You can select up to 5 characters at a time.
Step 2: Use Double-Click for Quick Selection
- Double-clicking on a character enables multiple selection mode.
- Choose up to 5 characters instantly.
Step 3: Click the “Add to LCD” Button
- Once you have selected up to 5 characters, click the “Add to LCD” button.
- All selected characters will be added to the LCD at once.
By using the Arduino 16×2 LCD Custom Character Generator, you can create and implement personalized icons, symbols, and animations for your 16×2 LCD projects effortlessly. Start designing your custom characters today!
Why You Need the Arduino 16×2 LCD Custom Character Generator
Designing characters manually for an Arduino 16×2 LCD can be tedious. But with this Arduino 16×2 LCD Custom Character Generator, you can visualize and generate the required code instantly. No more struggling with binary calculations or adjusting pixels by trial and error. This tool offers a simple, interactive, and accurate solution.
Table of Contents
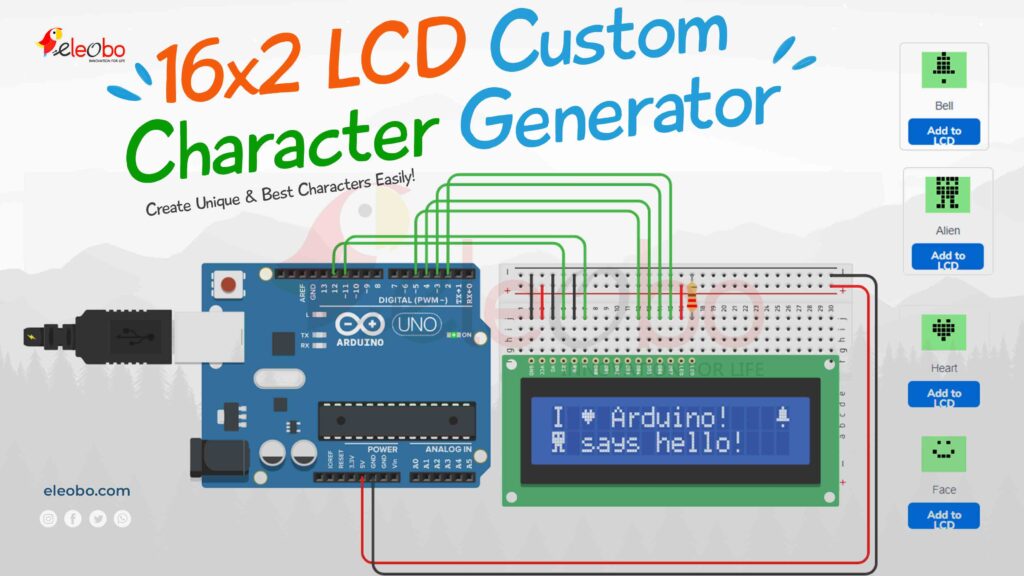
Arduino code example for using custom characters on a 16×2 LCD display
#include <LiquidCrystal.h>

// Initialize the library with the numbers of the interface pins
// RS, E, D4, D5, D6, D7
LiquidCrystal lcd(12, 11, 5, 4, 3, 2);

// Custom character definitions
byte Heart[] = {
  B00000,
  B01010,
  B11111,
  B11111,
  B01110,
  B00100,
  B00000,
  B00000
};

byte Bell[] = {
  B00100,
  B01110,
  B01110,
  B01110,
  B11111,
  B00000,
  B00100,
  B00000
};

byte Alien[] = {
  B11111,
  B10101,
  B11111,
  B11111,
  B01110,
  B01010,
  B11011,
  B00000
};

byte Face[] = {
  B00000,
  B01010,
  B00000,
  B10001,
  B01110,
  B00000,
  B00000,
  B00000
};

void setup() {
  // Initialize the LCD with 16 columns and 2 rows
  lcd.begin(16, 2);

  // Create custom characters
  lcd.createChar(0, Heart);
  lcd.createChar(1, Bell);
  lcd.createChar(2, Alien);
  lcd.createChar(3, Face);

  // Display a welcome message
  lcd.setCursor(0, 0);
  lcd.print("Custom Chars:");

  // Display the custom characters
  lcd.setCursor(0, 1);
  lcd.write(byte(0)); // Heart
  lcd.print(" ");
  lcd.write(byte(1)); // Bell
  lcd.print(" ");
  lcd.write(byte(2)); // Alien
  lcd.print(" ");
  lcd.write(byte(3)); // Face

  // Display a message with custom characters
  delay(3000);
  lcd.clear();
  lcd.setCursor(0, 0);
  lcd.print("I ");
  lcd.write(byte(0)); // Heart
  lcd.print(" Arduino!");

  lcd.setCursor(0, 1);
  lcd.write(byte(2)); // Alien
  lcd.print(" says hello!");
}

void loop() {
  // Make the bell character blink every second
  lcd.setCursor(15, 0);
  lcd.write(byte(1)); // Bell
  delay(500);
  lcd.setCursor(15, 0);
  lcd.print(" ");
  delay(500);
}
For Tinkercad, animate and simulate this circuit.
Click Here
Features That Make This Tool Stand Out
1. Live LCD Preview Display
- Instantly see how your custom characters will look on a real Arduino 16×2 LCD.
- Click on either LCD row to select where characters will be placed.
- Add multiple characters to build detailed designs.
2. Simplified Code Output
- Generates only the essential binary data needed for your LCD.
- Eliminates unnecessary extra lines of code.
- Includes a Copy Code button for easy transfer of byte arrays.
3. Support for Multiple Characters in One Code Block
- Add multiple characters to the LCD preview simultaneously.
- Click Generate Code to get an output for all displayed characters.
- Automatically assigns unique character arrays for each custom design.
4. User-Friendly Interface
- Two-column layout: Editor on the left, LCD preview on the right.
- Click between LCD rows to arrange characters effectively.
- Use the Add to LCD button to place characters precisely.
- Remove unwanted characters using the Delete button.
How to Use the Arduino 16×2 LCD Custom Character Generator
Step 1: Design Your Character
Click on the 5×8 pixel grid to create a custom character. Each pixel represents an illuminated part of the LCD display.
Step 2: Save Your Character
Give your character a unique name and save it for future use.
Step 3: Add the Character to the LCD Preview
Click Add to LCD to place your custom character onto the preview screen.
Step 4: Organize the LCD Rows
Select different rows to arrange multiple characters accurately on the Arduino 16×2 LCD.
Step 5: Generate and Copy the Code
Click Generate Code to create the Arduino-compatible byte array. Then, use the Copy Code button to copy the generated data and paste it into your project.
Why This Tool is a Game-Changer for Arduino Enthusiasts
- Saves time and effort – No more manual binary calculations.
- Beginner-friendly – No coding skills required to design characters.
- Real-time LCD preview – See exactly how your characters will appear.
- Multiple character support – Design and arrange several characters at once.
- One-click copy function – Easily integrate generated code into Arduino projects.
Future Updates & Enhancements
We are continuously improving the Arduino 16×2 LCD Custom Character Generator to make it even better! Here’s what’s coming soon:
- More customization options for pixel arrangement.
- Advanced LCD preview modes for better visualization.
- Integration with Arduino libraries to streamline your projects.
Start Creating Custom Characters Today!
The Arduino 16×2 LCD Custom Character Generator makes it easier than ever to create and preview unique designs for your Arduino 16×2 LCD. Whether you need special symbols, logos, or animated characters, this tool provides everything you need.
Meta Description:
Easily create custom characters for your Arduino 16×2 LCD with the Arduino 16×2 LCD Custom Character Generator. Live preview, simplified code output, and multiple character support make this tool essential for every Arduino enthusiast!
- Download the BlueBot Controller App here.
- Make sure you have a Bluetooth-enabled smartphone to pair with your project.
Downlaod Basic electronics e-Book Click Here
Visit : Home Page
Learn about other sensors, such as Arduino sensors.