Are you intrigued by the idea of using Arduino to control a mouse for unique applications, including gaming and automation? If so, you’ve come to the right place! In this comprehensive guide, we’ll explore how Arduino controls mouse UnknownCheats can be a game-changer for tech enthusiasts, gamers, and DIY makers. From the components you’ll need to step-by-step instructions, cost estimates, and exciting applications, this blog has it all. Let’s dive in and unlock the potential of Arduino controls mouse UnknownCheats!
Table of Contents
Why Arduino Controls Mouse UnknownCheats is Revolutionary
The concept of Arduino controls mouse UnknownCheats is revolutionizing the way we interact with technology. By combining the power of Arduino with creative coding, you can create custom mouse controls for gaming, automation, and even assistive technologies. Whether you’re a gamer looking to gain an edge or a tech enthusiast exploring new possibilities, Arduino controls mouse UnknownCheats offers endless opportunities for innovation.
Components Needed for Arduino Controls Mouse UnknownCheats
To build a system where Arduino controls mouse UnknownCheats, you’ll need the following components:
- Arduino Board (e.g., Arduino Uno or Nano) – The core of the project.
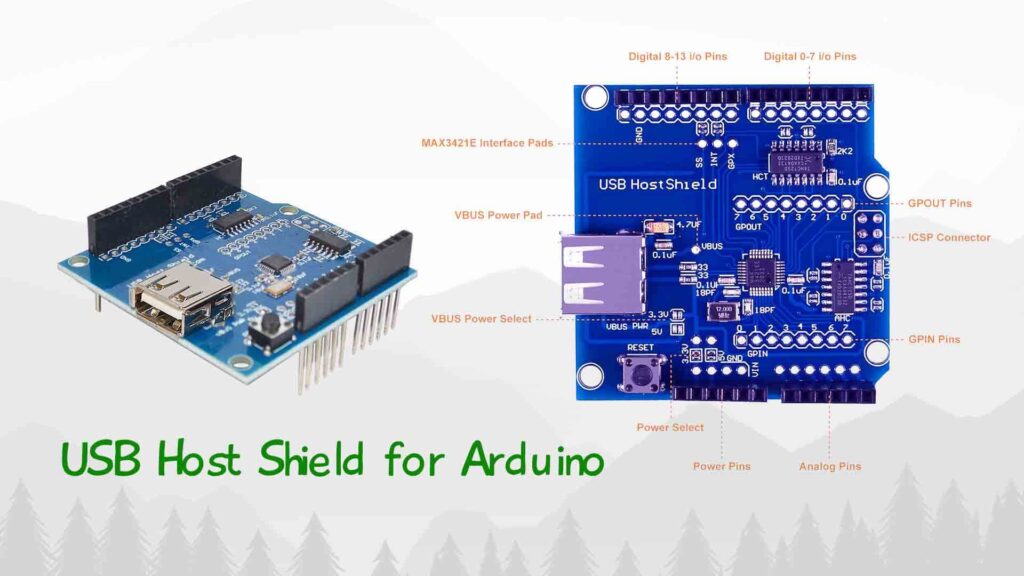
- USB Host Shield – Enables communication between Arduino and USB devices like a mouse.
- Mouse – A standard USB or PS/2 mouse.
- Jumper Wires – For connecting components.
- Breadboard – For prototyping and testing.
- Resistors and Capacitors – For stabilizing the circuit.
- Power Supply – A 5V power source or USB cable to power the Arduino.
- Push Buttons or Sensors (optional) – For additional control inputs.
Step-by-Step Guide to Building Arduino Controls Mouse UnknownCheats
Step 1: Gather Your Components
Before starting, ensure you have all the components listed above. Compatibility is key, so double-check that your Arduino board and USB host shield work together seamlessly.
Step 2: Connect the USB Host Shield to Arduino
- Place the USB host shield on top of the Arduino board.
- Align the pins correctly and solder them if necessary.
- Use jumper wires to connect the shield to the Arduino if soldering isn’t an option.
What is a USB Host Shield?
A USB Host Shield allows an Arduino (or similar microcontroller) to act as a host for USB devices. It provides the capability for your microcontroller to interact with various USB devices, such as keyboards, mice, USB drives, printers, or even some USB-based sensors. Essentially, it enables your Arduino to communicate with and control USB peripherals, just like a regular computer.
Why is it used?
- Connecting USB Devices: It allows Arduino to interface with USB peripherals.
- Expand Functionality: Enables interaction with a variety of USB devices that otherwise wouldn’t be possible with just the Arduino alone.
- Data Transfer: It facilitates data transfer between Arduino and devices like USB flash drives or HID devices (keyboards, mice).
- More Complex Projects: For projects requiring interaction with USB devices, the USB Host Shield can simplify complex implementations.
Pin Connections for USB Host Shield:
When using a USB Host Shield with an Arduino, the following pin connections are common:
- VCC (5V): Powers the shield.
- GND: Ground connection.
- D+: Data Plus pin for USB communication.
- D-: Data Minus pin for USB communication.
- Pin 10: Often used for the SS (Slave Select) signal in SPI mode. This is the control line for SPI communication with the host shield.
- Pin 11 (MOSI): Master Out Slave In, used for SPI communication.
- Pin 12 (MISO): Master In Slave Out, used for SPI communication.
- Pin 13 (SCK): Serial Clock, used for SPI communication.
- Reset Pin: A reset line to reset the USB Host Shield.
How the USB Host Shield Works with Arduino:
- SPI Communication: The USB Host Shield communicates with the Arduino using the SPI interface, and the Arduino controls the shield via this interface.
- The USB library for Arduino makes it easier to interface with USB devices by providing functions that abstract away the low-level details of USB communication.
If you’re using a USB device like a flash drive or a keyboard, you can access and control it directly from your Arduino via the USB Host Shield.
Step 3: Connect the Mouse to the USB Host Shield
- Plug the mouse into the USB port on the host shield.
- Ensure the connection is secure and the mouse is powered.
Step 4: Upload the Code to Arduino
- Open the Arduino IDE on your computer.
- Install the necessary libraries (e.g., USB Host Shield Library).
- Write or upload a sample code to control the mouse. Here’s an example:
#include <USBHost.h>
USBHost usb;
MouseController mouse;

void setup() {
  Serial.begin(9600);
  usb.begin();
}

void loop() {
  if (usb.isConnected()) {
    if (mouse.isConnected()) {
      int x = mouse.getX();
      int y = mouse.getY();
      Serial.print("X: ");
      Serial.print(x);
      Serial.print(" Y: ");
      Serial.println(y);
    }
  }
}- Upload the code to your Arduino board.
Step 5: Test the Setup
- Open the Serial Monitor in the Arduino IDE.
- Move the mouse and observe the X and Y coordinates displayed on the screen.
- If everything works, your Arduino controls mouse UnknownCheats setup is ready!
Estimated Cost of Arduino Controls Mouse UnknownCheats Project
The cost of this project depends on the components you choose. Here’s a rough estimate:
- Arduino Uno: $20
- USB Host Shield: $15
- Mouse: $10 (or use an old one)
- Jumper Wires and Breadboard: $5
- Miscellaneous (resistors, capacitors): $5
Total Estimated Cost: $55
This affordable price makes Arduino controls mouse UnknownCheats projects accessible to everyone.
Applications of Arduino Controls Mouse UnknownCheats
The Arduino controls mouse UnknownCheats setup has a wide range of applications. Here are some exciting examples:
- Gaming: Create custom mouse controls for gaming, giving you an edge in competitive play.
- Automation: Automate repetitive tasks like clicking or dragging in software applications.
- Accessibility: Develop assistive devices for individuals with limited mobility.
- Robotics: Integrate mouse controls into robotic systems for precise movements.
- Education: Teach students about microcontrollers, coding, and electronics in a fun and engaging way.
Why Choose Arduino for Mouse Control?
Arduino is an excellent choice for Arduino controls mouse UnknownCheats projects because of its simplicity, versatility, and affordability. With a vast community and extensive documentation, you’ll find plenty of resources to help you along the way. Additionally, Arduino’s open-source nature allows you to customize your project to suit your specific needs.
Tips for Success
- Double-Check Connections: Ensure all components are connected correctly to avoid errors.
- Use Quality Components: Invest in reliable components for better performance and durability.
- Experiment and Customize: Don’t be afraid to tweak the code or add new features to your project.
- Join the Community: Engage with Arduino forums and communities to learn from others and share your progress.
Conclusion
The Arduino controls mouse UnknownCheats project is a fantastic way to explore the capabilities of this powerful microcontroller. With just a few components and some basic coding, you can create a custom mouse control system tailored to your needs. Whether you’re a beginner or an experienced maker, this project offers endless possibilities for innovation and creativity.
So, what are you waiting for? Grab your Arduino board, gather the components, and start building your own Arduino controls mouse UnknownCheats setup today. The future of technology is in your hands!
Download BlueBot Controller App and start your journey today!